Bandaging & compression therapy
Bandaging is often done to drain (excess) fluid in arms or legs. This technique is also known as compression therapy or compressive bandaging.
Why bandage?
Fluid in arms or legs can be very painful for someone. People often complain of throbbing hands or tingling legs. Someone can no longer wear their shoes or the pants no longer fit when the legs are very swollen.
Bandaging increases external pressure on the swollen body part. The bandage pushes or squeezes the moisture, as it were. This is called compression. The fluid is pushed back to the torso. Medication (e.g. antidiuretics) can also help to get rid of excess fluid.
Causes of excess fluid
Excess fluid can occur as a result of problems in the lymphatic or vascular system. For example, due to lipedema, or due to the (necessary) removal of lymph nodes as a result of a tumor or malfunctioning veins. Swollen legs can indicate a heart problem, such as decompensatio cordis (heart failure).
The cause of (excess) fluid is not always known. If the cause is not known, you should always consult with a doctor about the best course of action.
Bandaging techniques & types of bandages
There are two different types of bandages:
- Short stretch bandages
- Long-stretch bandages
You can read below which bandage you use when and with which technique. Do you want to practice how to bandage yourself? This is possible via CareUp’s 3D simulation game. You will learn the theory, but also the practice. And you can also have yourself tested. Do you succeed? Then you will receive a certificate and accreditation points and you can call yourself competent in bandaging.
Bandaging short stretch
When a client can still move the limb itself, use a bandage with a short stretch. These bandages work because of the pressure change that takes place as soon as the client moves the bandaged body part.
Here are the things to look out for in short-stretch bandage compression therapy:
- Apply the bandages in the morning. The client is then often rested, so there is less fluid in the limbs.
- The limb shrinks due to bandaging. That is why it is important that you change bandages at least 2x a week. Or earlier/more often when the bandage drops.
Bandaging long stretch
When a client is immobile, or when bandages often need to be changed due to ulcers, for example, you use a bandage with a long stretch.
Here are the things to look out for in long-stretch bandage compression therapy:
- Apply the bandages in the morning. The client is then often rested, so there is less fluid in the limbs.
- There is no consensus about the way of bandaging with long stretch bandages. Therefore, always discuss with the doctor whether one or two bandages should be used.
- Always remove the long stretch of bandages before night.
Here's what to look out for when applying a bandage:
When applying a bandage, these are the points of attention that you should pay attention to:
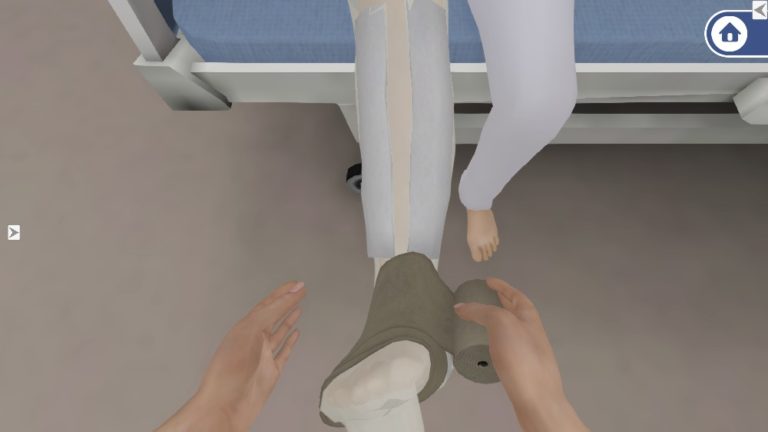
- Apply the bandage without wrinkles and folds. Make sure the bandage is completely smooth, otherwise pressure marks may occur.
- Fill uneven surfaces (if necessary) with padding material. This applies to cavities and protruding parts. (For example, the malleoli on the sides of the ankles)
- Always look ‘in the roll’ when you swaddle and follow the shape of the limb to be bandaged.
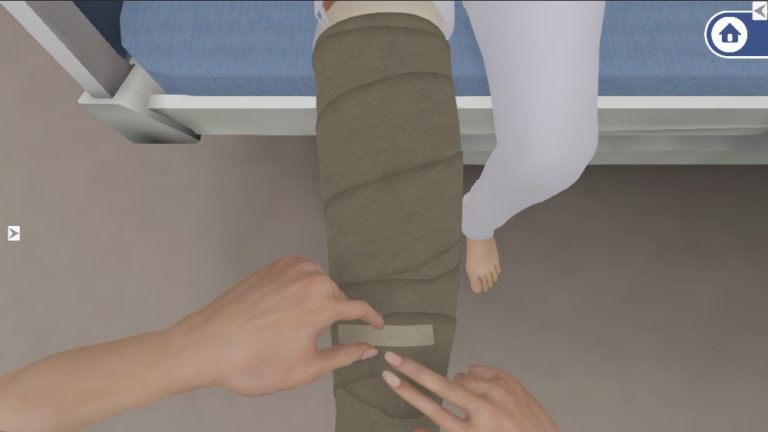
- Need a new bandage halfway through? Secure the first bandage with a firm stroke. Never do this circularly, as this clamps down on the flow.
- After installation, no openings should be visible.
- Do not use fixation clips, but secure the bandage with plaster or tape.
- If necessary, use plasters over the bandages to prevent sagging.
Bandaging protocol
Depending on the part of the body where the bandage is to be applied, the technique may differ. The technique for bandaging is laid down in the
These are the general steps to be taken according to the Vilans KICK bandaging protocol:
- Apply hand hygiene and prepare the materials
- Cut 4 strips of plasters of about 10 cm
- Check the condition of the bandages
- Make sure the body part you want to bandage is bare and relaxed.
- Check the skin for wounds and irregularities
- Apply the tubular bandage and padding so that any irregularities are eliminated and the limb is nice and smooth
- Check (depending on the limb to be bandaged) the color of the hands or toes and ask if the bandage is pain-free.
Are you skilled in applying a bandage? Practice this action with the 3D simulation game from CareUp. In this simulation, the theory is covered and you also perform the action directly yourself via a practical simulation. Have you practiced enough and are you confident in your competence? Then take the test and get accreditation points for the BIG register!
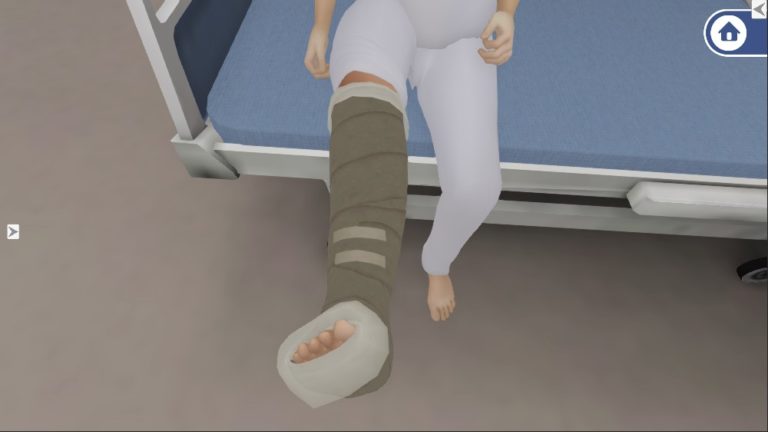
Bandaging lower leg and foot protocol
Moisture always runs down. As a result, the ankles, feet and lower legs become the first to become thick. You therefore always swing from distal (from the extremities of the body) to proximal (towards the body).
In addition to the steps from the Vilans protocol mentioned above, specific actions apply to bandaging a lower leg or foot. These are the steps that, according to the Vilans KICK protocol:
- Place the ankle at a right angle (90 degrees) to the lower leg.
- Bandage from the inside out. Start from the big toe towards the little toe.
- Make one or two turns around the forefoot. With each turn, pull the bandage a little, about 2 cm.
- Then bandage the heel, heel and lower part of the ankle, without tightening the winding.
- Follow the shape of the lower leg upwards and keep the same pressure on the bandage. Continue to tighten the bandage for about 2 cm after each turn.
- Stop just below the kneecap with a winding that is not too tight.
- Repeat these actions with a second bandage.
Bandaging thigh protocol
When the thigh has to be bandaged, it means that the entire leg is bandaged. This is necessary because otherwise the fluid will run down (to the ankles) again. This means that when you have to bandage a client’s thigh, you start with the first 5 steps of the ‘bandaging lower leg and foot protocol’.
- Place the ankle at a right angle (90 degrees) to the lower leg.
- Bandage from the inside out. Start from the big toe towards the little toe.
- Make one or two turns around the forefoot. With each turn, pull the bandage a little, about 2 cm.
- Then bandage the heel, heel and lower part of the ankle, without tightening the winding.
- Follow the shape of the lower leg upwards and keep the same pressure on the bandage. Continue to tighten the bandage for about 2 cm after each turn.
- Bandage around the knee, without putting on the bandage. Make sure that the knee can still bend a little.
- Continue bandaging the thigh to the groin and tighten the bandage about 2 cm after each turn.
Note: Preferably use one bandage for the entire leg. If the bandage is too short, stop just below or above the knee with the first bandage. Then, with the second bandage, continue where you left off, but start with a turn without putting on the bandage extra.
Bandaging thrombosis leg
A thrombosis leg can also be bandaged. However, medication must have been administered . A bandage around a thrombosis leg is used until most of the fluid has disappeared from the leg. When the amount of moisture has decreased sufficiently, you can switch to compression stockings.
Problems with bandaging
Various complications can occur with bandaging. The most common and important problems with bandaging are:
- Irritated skin under the bandage
- The bandages hurt
- The toes or fingers are blue
- The toes are white
The most common problems with bandaging are that the bandages sink down, or that holes or windows are visible after bandaging. In both cases, you will need to reapply the bandages.
Problems with bandaging
Is the client in pain or do the toes or fingers turn blue? Then let the client move first if possible. If the pain does not stop within 15 minutes, reapply the bandages. If the pain persists after that, notify the doctor.
Irritated skin
Is there an irritated skin due to the bandages? Then use a skin care ointment for the skin.
White toes
If the client develops white toes after bandaging, this may indicate arterial problems. In this case, remove the bandages immediately and notify the doctor.
Did you already know this theory about bandaging a lower leg, thigh or ankle? Practice applying a bandage now via CareUp’s 3D simulation game. You test your theoretical knowledge directly and you also practice the action directly through the practical simulation. Do you prove that you have mastered the theory and execution of the test? Then you earn a certificateand accreditation points!